
How to Set up a Sharp Alarm Clock: Step-by-Step Setup Guide for 2026
Learn how to set up a sharp alarm clock, configure time and dual alarms, test battery backup, and adjust dimmer settings in this October 2026 guide.
 By McKenzie Dillon
Updated October 6, 2026
By McKenzie Dillon
Updated October 6, 2026

Waking up on schedule without the disruptive glare, notification pings, or unexpected battery drainage of a smartphone remains one of the most effective habits for healthy sleep. Dedicated bedside digital clocks offer straightforward timekeeping that keeps evening routines free from mobile distractions. When you bring home a new digital timekeeper, understanding how to set up a sharp alarm clock ensures that you never miss an early shift, school drop-off, or morning appointment. Pairing a reliable clock with proper nightstand positioning creates an environment tailored for restful sleep, especially if you explore reliable bedroom alarm clocks designed to simplify nighttime viewing.
Many sleepers struggle with complicated multi-button programming interfaces, confusing 12-hour AM and PM indicator dots, or uncalibrated volume levels that either startle them awake or fail to break through deep slumber. Sharp bedside clocks address these issues with straightforward button layouts, ranging from keyboard-style front panels to specialized high-output sound systems. Whether you need standard morning beeps or extreme decibel alarms suited for deep sleep cycles, our guide to alarm clock options for heavy sleepers highlights how dedicated acoustic alerts support morning punctuality. Taking a few minutes to configure time synchronization, dual alarm routines, and backup battery systems prevents unwanted morning surprises.
| Award | Product | ACR Score About ACR ScoreThe ACR Score is our own rating from 0 to 10, based on performance, design and build, ease of use, and value. It reflects independent research and is never influenced by manufacturers, retailers, or affiliate commissions. Learn more › | |
|---|---|---|---|
| Best Overall |
Sharp Shockwave 105dB Super Loud Dual Alarm Clock
|
9.1/10 | Buy |
| Best Premium |
 Sharp Big Bang 115dB Extra Loud Alarm Clock
|
9.1/10 | Buy |
 Sharp Big Bang Super Loud 115dB Alarm Clock
|
8.8/10 | Buy | |
| Best Budget |
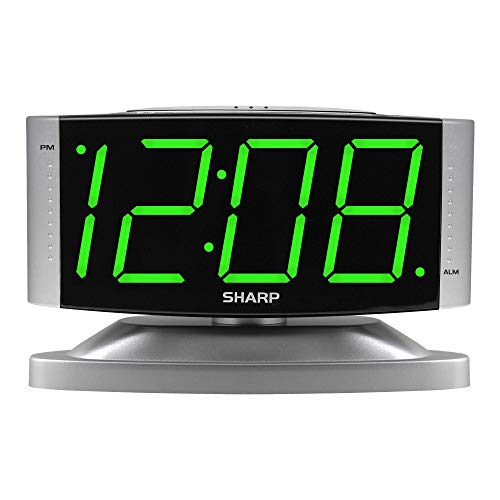 Sharp Digital Alarm Clock with Swivel Base
|
8.6/10 | Buy |
 Sharp Digital Bedside Alarm Clock with Simple
|
8.4/10 | Buy | |
| Best Value |
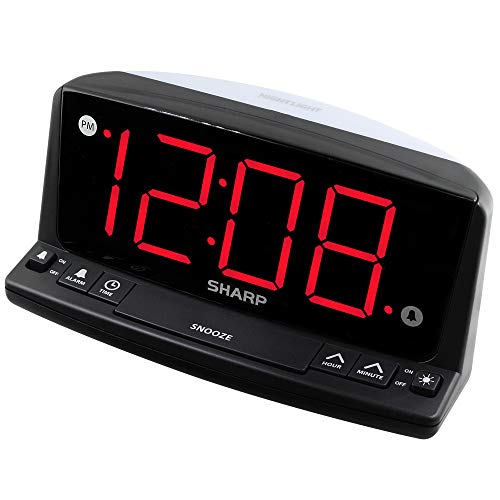 Sharp Digital Alarm Clock with 1.8-Inch Red LED
|
8.4/10 | Buy |
Sharp Shockwave 105dB Super Loud Dual Alarm Clock
The Sharp Shockwave delivers up to 105dB of wake-up audio across four distinct tones, making it an effective bedside solution for heavy sleepers and hard-of-hearing individuals. Featuring dual alarms, a four-step dimmable red LED display, and battery backup timekeeping, it provides straightforward reliability without taking up excess nightstand space.
Pros
- High maximum volume reaching up to 105dB designed for heavy sleepers and hard-of-hearing users
- Four distinct alert sounds provide variety beyond standard electronic beeps
- Red LED display with four brightness levels helps reduce ambient bedroom glow
- Dual independent alarms support multiple wake-up schedules
- Battery backup maintains internal time and alarm settings during household power interruptions
Cons
- Display remains unlit during power outages when running on backup AA batteries
- Requires two AA batteries for outage protection that must be purchased separately
- Does not include integrated USB charging ports for bedside mobile devices
Sharp Big Bang 115dB Extra Loud Alarm Clock
The Sharp Big Bang is a dedicated bedside alarm clock engineered with an intense 115dB maximum output and six distinct wake sounds to cut through deep sleep. Featuring dual alarms, an oversized dimmable white LED display, and battery backup memory protection, it is an effective pick for heavy sleepers, shift workers, and students who routinely sleep through standard phone alarms.
Pros
- Extreme 115dB sound capability delivers authoritative volume for deep sleepers and shift workers
- Selection of six unique alarm sounds prevents morning acoustic habituation
- Dual alarm settings provide convenience for couples or multi-schedule routines
- Large white LED numerals are easy to read from pillow height across the room
- Compact and lightweight 0.78-pound frame occupies minimal nightstand space
Cons
- Battery backup requires 2 AAA batteries that are not included in the box
- Backup battery system only preserves internal settings and does not operate the display or sound during an outage
- Does not include integrated USB charging ports or wireless charging pads for mobile devices
Sharp Big Bang Super Loud 115dB Alarm Clock
The Sharp Big Bang is an electric bedside alarm clock engineered with an ear-splitting volume of up to 115dB across six unique wake sounds and dual independent alarms. It is a practical pick for deep sleepers, students, and shift workers who need serious volume and a customizable snooze interval to ensure they get out of bed on time.
Pros
- Massive acoustic output reaching up to 115dB to help wake deep sleepers and heavy snoozers
- Dual independent alarms accommodate multiple wake-up routines on the same bedside table
- Highly flexible snooze timer can be adjusted anywhere from 1 to 59 minutes instead of being locked to a fixed interval
- Dimmer features an Off setting for sleepers who need an unlit bedroom environment at night
- Battery backup preserves programmed time and alarm configurations through temporary power cuts
Cons
- Battery backup does not illuminate the screen or trigger audible alarms during an electrical outage
- Dimmer relies on three stepped levels (High, Low, Off) rather than a smooth stepless dial
- Requires two AAA batteries for memory backup that are not included in the package
Sharp Digital Alarm Clock with Swivel Base
The Sharp Swivel Base Digital Alarm Clock delivers dependable bedside utility with high-visibility jumbo digits, two brightness levels, and a loud wake-up buzzer with dual volume settings. Designed for straightforward operation, it is an ideal choice for seniors, students, and anyone seeking an uncomplicated nightstand timepiece.
Pros
- Swivel base enables flexible viewing angle adjustments from bedside tables or desks.
- Reliable battery backup sounds the alarm during power outages even while blanking the display to conserve power.
- High and low volume settings accommodate both deep sleepers and sound-sensitive sleepers.
- Straightforward setup with dedicated controls suitable for all ages, including seniors.
Cons
- Brightness control offers only two steps (High and Low) rather than a continuous stepless dial.
- Screen goes completely dark during a power outage when running on the 9V backup battery.
- Requires a standard US 120V electrical outlet and cannot be used with 240V international power.
Sharp Digital Bedside Alarm Clock with Simple
The Sharp Digital Alarm Clock combines simple keyboard-style controls with a high-visibility red LED readout and an easy-to-hit snooze bar. With its compact footprint and reliable AAA battery backup that keeps the alarm active during power outages, it is an ideal straightforward bedside clock for minimalists, seniors, and students.
Pros
- Intuitive keyboard-style top buttons make programming time and alarms straightforward for all ages
- Loud audible alarm helps wake deep sleepers and everyday commuters reliably
- Dedicated battery backup keeps the alarm functional even during overnight electrical blackouts
- Oversized top snooze button is easy to press without fumbling around in the dark
- Space-saving 4.35-inch wide chassis preserves valuable space on compact bedside tables
Cons
- Lacks adjustable brightness dimming controls, which may feel too bright for very light-sensitive sleepers
- Requires 2 AAA backup batteries that are not included in the package
- Display remains dark during a power outage until mains AC electricity is restored
Sharp Digital Alarm Clock with 1.8-Inch Red LED
The Sharp Digital Bedside Alarm Clock pairs a jumbo 1.8-inch red LED readout with intuitive front-facing keyboard controls and a built-in night light. With a loud beep alarm and a 9V battery backup that still sounds during power outages, it is an accessible, reliable option for seniors, heavy sleepers, and straightforward nightstand timekeeping.
Pros
- Large 1.8-inch red LED numerals are easily readable from across the room
- All buttons are mounted directly on the front panel for senior-friendly, intuitive operation
- 9V battery backup ensures the alarm still sounds even if an overnight storm knocks out household power
- Integrated night light feature provides added functionality for nurseries, bedrooms, or guest rooms
- Generous 9-minute snooze gives groggy sleepers a simple, repeatable morning buffer
Cons
- Lacks documented multi-level brightness dimming, which may feel bright to light-sensitive sleepers in pitch-black bedrooms
- Display screen blanks out during power outages to conserve backup battery energy
- Requires a standard 9V battery for backup operation that is not included in the box
Step-by-Step Guide on How to Set Up a Sharp Alarm Clock
Setting up a bedside clock should never feel like deciphering a dense technical manual. Sharp digital alarm clocks are recognized for their accessible layouts, yet slight variations across models can leave you wondering which button controls the hour digits or how to engage backup memory. Getting your clock configured properly from the start ensures reliable morning alerts and a peaceful bedroom environment.
Unboxing, Nightstand Placement, and AC Power Connection
Begin the setup process by carefully unpacking the clock and removing all protective plastic films from the front display lens. Inspect the attached AC power cord for any physical kinks or visible damage before plugging it into a standard 120-volt household wall outlet. Placing the clock on a stable, level nightstand surface helps prevent accidental knocks during groggy morning reaches.
Position the display so that it faces your resting eye level at an unobstructed angle. Many Sharp models feature wide viewing lenses or integrated swivel bases that allow you to pivot the display toward your pillow. Keeping the clock at arm’s reach ensures you can access the top snooze bar comfortably without straining across the nightstand. Avoid sharing the wall outlet with high-draw appliances like space heaters, which can introduce electrical noise or cause unexpected breaker trips.
Route the power cord behind your bedside furniture to prevent tangling with phone chargers or reading lamp cords. If your nightstand has limited space, consider how your bedside accessories interact, such as keeping devices separate from alarm clocks with integrated phone charging to avoid excessive cord clutter. Once connected to wall power, the LED screen will immediately light up, typically flashing a default factory time like 12:00.
Installing the Correct Backup Batteries for Outage Security
Mains AC electricity powers the illuminated display and speaker hardware on all standard Sharp digital clocks. However, installing backup batteries is essential to safeguard your programmed settings during unexpected residential power cuts. Sharp designs use different battery chemistries across product lines, so you must inspect the bottom or rear battery door before inserting cells.
Classic models, including units with swivel bases or oversized 1.8-inch digits, commonly require a single 9-volt transistor battery. In contrast, newer heavy-sleeper units like the Shockwave or Big Bang series use either two AA or two AAA alkaline batteries. Slide open the compartment latch and match the positive and negative polarity terminals exactly as stamped inside the plastic mold. Avoid mixing old batteries with fresh cells, and do not use rechargeable chemistries unless specified, as lower nominal voltages can compromise memory retention.
Understanding how Sharp implements battery backup will prevent unnecessary confusion during an electrical outage. When AC power disconnects, the LED display intentionally turns off completely to conserve battery life. The internal quartz timekeeping circuit and your programmed alarm times remain active silently in memory. Once wall electricity returns, the display illuminates immediately with the correct current time, eliminating the frustration of flashing midnight digits.
Mapping the Interface: Front Keyboard Controls versus Rear Switches
Sharp employs two distinct design philosophies across its bedside clocks to handle daily adjustments. Several popular models feature keyboard-style buttons arranged directly on the front bezel beneath the digital readout. This design places primary controls, including time setting, alarm setting, and digit increments, in plain sight so you never have to reach blindly behind the unit.
Other models, particularly heavy-duty alarms with multi-tone sound synthesizers, divide functions between the top panel and rear chassis. On these units, everyday buttons like the snooze bar and alarm disarm sliders sit prominently along the top surface. Secondary programming toggles, such as alarm sound selection, high or low volume sliders, and dimmer controls, reside on the back panel to prevent accidental adjustments during daily handling.
Familiarizing yourself with button tactile feedback takes only a moment and prevents setup errors. Front-facing keyboard buttons generally require a deliberate, firm press that provides a soft click response. In contrast, rear slide switches click firmly into detents for specific settings like volume tiers or tone profiles. Knowing where each physical control resides ensures you can make minor adjustments in dim bedroom lighting without turning on overhead fixtures.
Step-by-Step Current Time Synchronization
Synchronizing the current time is the foundational step in programming your clock. On front keyboard models, press and hold the TIME SET button using one finger while using your other hand to adjust the digits. While holding the TIME button down, press the HOUR button repeatedly until the correct hour appears on the digital readout.
Pay close attention to the small PM indicator dot located on the left edge of the display face. Sharp digital clocks operate on a standard 12-hour cycle, meaning that cycling through twelve hours changes the indicator from morning to evening. If you are setting the clock for eight o’clock in the evening, advance the hours until the PM dot glows beside the numerals. Failing to observe this indicator is the most common reason wake-up alarms fail to sound at the intended morning hour.
After establishing the correct hour, continue holding the TIME SET button while pressing the MINUTE button to reach the accurate minute count. Pressing the button once advances the counter by a single digit, while holding it down accelerates the scrolling speed. Once the display matches your local time, release both buttons. The clock will instantly lock the synchronized time into memory and resume its regular second-by-second internal count.
Programming Single and Dual Wake-Up Alarms
Configuring your wake-up time follows a mechanical sequence similar to setting the primary clock. For single-alarm Sharp models, press and hold the ALARM SET button located on the front panel or top edge. While holding this button down, tap the HOUR button to select your wake-up hour, ensuring the PM indicator is unlit for morning routines. Then, press the MINUTE button to finalize the exact departure minute, releasing the ALARM SET button when finished.
Models equipped with dual alarms allow you to store two independent wake schedules for partners or split work routines. These units provide dedicated ALARM 1 and ALARM 2 programming buttons, often paired with independent three-position slide switches. To program the first alarm, press and hold the AL1 button while cycling through the hour and minute digits. Repeat the exact sequence using the AL2 button to establish a separate time for your secondary wake-up or weekend schedule.
Setting the wake time alone does not arm the sounder. You must switch the physical alarm toggle from the OFF position to ON, or select between Alarm 1, Alarm 2, or Both. Look closely at the screen to verify that a dedicated alarm bell icon or illuminated dot appears beside the numbers. If this indicator light remains off, the clock will remain completely silent when the designated wake-up time arrives.
Selecting Alarm Tones and Adjusting Decibel Volume
Acoustic output varies significantly depending on the specific Sharp model resting on your nightstand. Standard compact bedside clocks deliver a traditional ascending electronic beep alarm that provides dependable awakening for average sleepers. These standard models often include a straightforward Low and High volume slide switch on the rear panel, letting you balance waking urgency against morning auditory comfort.
If you own an extra-loud model like the Shockwave or Big Bang, you have access to substantial decibel output and synthesized sound options. The Shockwave features a physical selector switch that offers four distinct tones, including an Air Horn, School Bell, Train Whistle, or traditional Beep, alongside output settings reaching up to 105 decibels. The Big Bang expands this range further up to 115 decibels, incorporating six dynamic sounds such as a Rooster, Bugle, Siren, Jackhammer, or vocal Nagging alert.
When using high-decibel alarms, acoustic positioning requires careful consideration. A blast reaching over 100 decibels at close proximity can cause temporary ear discomfort if the speaker grille points directly toward your ear. Angle the chassis slightly toward the open bedroom space rather than directly at your pillow, and start with the Normal or Low volume tier before escalating to extreme thresholds. This balanced acoustic approach ensures you break through heavy sleep cycles without creating unnecessary morning startle stress.
Operating the Snooze Bar and Setting Custom Delays
Every Sharp digital alarm clock includes a prominent snooze bar positioned across the top housing for effortless access. When the morning alarm sounds, tapping this bar temporarily silences the acoustic alert while keeping the alarm cycle engaged. On most baseline models, the snooze interval is permanently set to a standard nine-minute delay, giving you brief intervals of extra rest before sounding again.
Certain advanced heavy-sleeper editions allow you to customize this snooze duration to fit your morning routine. On these programmable models, you can enter the snooze adjustment mode to modify the delay interval anywhere from 1 to 59 minutes. If you prefer a tight five-minute wake-up reminder or a longer fifteen-minute interval, you can adjust the digits using the standard minute controls, with the unit reverting to the default nine-minute window if left unadjusted.
Knowing how to turn off the alarm completely prevents daytime ringing while you are away from home. Pressing the snooze bar only pauses the alert temporarily; it will continue repeating every nine minutes until fully disarmed. To shut the sounder off until the following morning, slide the dedicated alarm switch to the OFF position, or press the ALARM OFF button located beside the snooze bar. Be sure to slide the switch back to ON before going to sleep so your morning schedule remains intact.
Calibrating Display Dimming and Bedside Night Lights
Display brightness plays a critical role in preserving sleep quality and keeping bedrooms pitch-black. Sharp clocks commonly feature red LED numerals, which provide natural optical advantages for nighttime viewing. Red wavelengths minimize high-energy visible light exposure, helping support natural melatonin production compared to harsh blue or cool-white displays.
To adapt to different room lighting conditions, Sharp incorporates stepped dimmer controls accessible via rear switches or dedicated front keys. Models typically provide High and Low dimmer toggles, while specialized versions offer three or four brightness tiers, ranging from vivid daytime clarity to an ultra-dim night setting. If your bedroom needs complete darkness, select the lowest visible tier that still allows comfortable time checks from your mattress without causing ambient glare.
Several Sharp models also incorporate a built-in front-facing night light that delivers a gentle accent glow for dark rooms. This feature is particularly helpful for navigating dimly lit bedrooms or checking on children without switching on harsh lamps, much like specialized nightstand clocks with night lights. The accent light activates with a simple rocker switch on the front housing, giving you immediate illumination whenever you need to step out of bed safely.
Troubleshooting Common Setup Mistakes and Display Errors
Even with an intuitive control scheme, small programming oversights can occasionally cause confusion. The most frequent issue encountered during initial setup is an alarm that appears to skip its scheduled wake-up time. In nearly every instance, this occurs because the 12-hour AM and PM cycle was inverted during programming. Check the PM indicator dot on the screen; if the dot illuminates while setting a seven o’clock morning alarm, the clock will wait until seven in the evening to trigger.
Another common concern involves a screen that remains completely blank after inserting batteries. As noted in the power specifications, Sharp digital alarm clocks are AC-powered devices that do not illuminate their LED screens on battery power alone. If you disconnect the clock from the wall outlet, the screen will turn completely dark, even with fresh alkaline batteries installed. Reconnecting the AC cord to an active wall outlet will restore the illuminated display immediately while retaining your saved time settings.
If the alarm sound seems muffled or unexpectedly quiet, verify the physical volume switch on the rear panel. When sliding controls between Low, Loud, or Extreme positions, ensure the switch clicks fully into its designated detent. A slider resting between contact points can cause erratic volume levels or silence the acoustic transducer entirely. Gently moving the switch back and forth clears minor oxidation from the internal contacts and establishes a solid electrical connection.
Running a Live Bedside Verification Test
Before relying on your freshly configured Sharp clock for a critical workday morning, take two minutes to execute a live test run. Adjust the alarm time to two minutes ahead of the current synchronized time displayed on the screen. Verify that the physical alarm switch is turned ON and that the corresponding alarm indicator dot or bell icon is visible on the display face.
Step back and wait for the digital minutes to advance to your test target. When the alarm triggers, confirm that the sound output matches your chosen tone and that the volume level is loud enough to wake you without causing acoustic distress. Test the top snooze bar by tapping it once, verifying that the sound pauses instantly and that the alarm status light blinks to indicate an active snooze countdown.
Finally, practice switching the alarm completely off using the designated slider or disarm button so you are confident in your morning muscle memory. Reset the alarm to your genuine wake-up time, double-check the AM or PM indicator, and confirm that the alarm toggle remains engaged. This quick verification routine provides peace of mind that your nightstand clock will perform reliably every morning.
About the author
McKenzie Dillon is a Certified Sleep Science Coach and experienced sleep-product editor who has personally tested dozens of sleep products. Her expertise bridges sleep technology, product evaluation, and practical guidance for creating more comfortable sleep and wake-up routines.