
How to Set a Digital Alarm Clock: Step-by-Step Guide for 2026
Learn how to set a digital alarm clock easily with this practical setup guide for October 2026, covering time synchronization, alarm programming, and dimming tips.
 By Jeremy Klein
Updated October 6, 2026
By Jeremy Klein
Updated October 6, 2026

Waking up startled by an unpredictable smartphone alert or finding a dark screen after an overnight software update creates unnecessary morning anxiety. Standalone nightstand clocks provide a dedicated, distraction-free solution for your bedroom routine, yet figuring out tiny toggles and cryptic symbols can feel frustrating in dim lighting. Learning how to set a digital alarm clock correctly ensures that your wake-up time, calendar dates, and sound profiles work reliably without sudden surprises. Upgrading to dependable bedside digital alarm clocks removes smartphone notifications from your sleeping space while helping you establish a consistent circadian rhythm.
Modern nightstand timepieces range from straightforward battery-operated travel units to advanced designs featuring multi-zone scheduling and full-range dimmer dials. While each manufacturer organizes buttons differently, the fundamental programming logic remains consistent across standard LED and LCD interfaces. Understanding how time-setting switches, dedicated alarm toggles, and 12-hour AM and PM indicators interact allows you to adjust schedules swiftly. Once you master the basic setup sequence, tailoring your wake-up experience becomes an intuitive and stress-free habit.
| Award | Product | ACR Score About ACR ScoreThe ACR Score is our own rating from 0 to 10, based on performance, design and build, ease of use, and value. It reflects independent research and is never influenced by manufacturers, retailers, or affiliate commissions. Learn more › | |
|---|---|---|---|
| Best Overall |
Raynic 7-Inch Digital Calendar Clock with 12
|
9.2/10 | Buy |
| Best Budget |
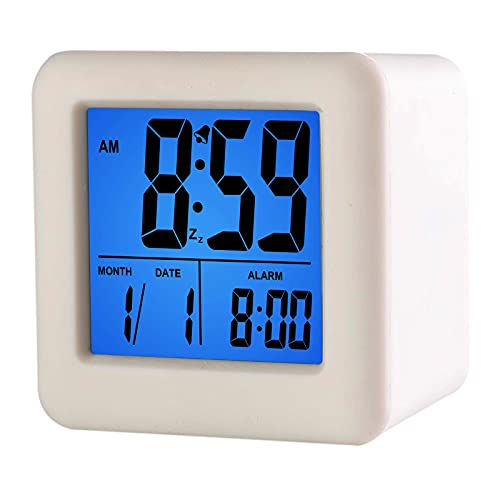 Plumeet Battery-Operated Digital Travel Alarm
|
8.9/10 | Buy |
 Sharp Digital Bedside Alarm Clock with Simple
|
8.4/10 | Buy | |
| Best Premium |
 DreamSky Auto Set Digital Bedside Alarm Clock
|
8.3/10 | Buy |
| Best Value |
 Odokee Digital Dual Alarm Clock with 0-100% Dimmer
|
8.1/10 | Buy |
 Odokee Digital Bedside Alarm Clock with 2-Inch
|
8.0/10 | Buy |
Raynic 7-Inch Digital Calendar Clock with 12
The Raynic 7-Inch Digital Calendar Clock pairs a clear date and time readout with 20 alarms, 20 reminders, and 12 display themes. It is a dependable nightstand or desktop schedule tracker for seniors, students, and anyone wanting a phone-free routine.
Pros
- Equipped with 20 alarms and 20 separate reminders, making it well-suited for medication schedules and busy routines.
- Offers 12 distinct display themes to optimize contrast and visual comfort across different lighting environments.
- Built-in Auto DST functionality automatically updates time twice a year without manual intervention.
- Flexible hardware design supports both desktop shelf placement and wall mounting.
- Semi-automatic dimming helps moderate bedroom light levels during sleep hours.
Cons
- Uses semi-automatic stepped dimming rather than a fully manual 0 to 100 percent stepless control dial.
- Lacks heavy-sleeper wake accessories such as an external vibrating bed-shaker puck.
- Does not include integrated USB device charging ports or wireless charging surfaces.
Plumeet Battery-Operated Digital Travel Alarm
The Plumeet Digital Travel Alarm Clock is a compact, battery-powered bedside clock featuring a bold 3-inch LCD screen, ascending beep alarm, and a shock-absorbing silicone sleeve. It is an ideal pick for students, frequent travelers, or anyone seeking simple, cord-free timekeeping without smartphone distractions.
Pros
- Protective silicone casing helps guard against accidental drops from nightstands or luggage handling
- Cordless battery operation eliminates messy cables and keeps the alarm running during household power outages
- Clear 3-inch LCD readout displays the time, calendar date, and active alarm setting at a single glance
- Progressive crescendo beep starts softly and gradually increases over 60 seconds to wake sleepers reliably
- Large top-mounted snooze button is easy to hit while half-awake for a 5-minute rest interval
Cons
- Requires 2 AA batteries that are not included in the package
- Lacks an AC adapter or USB power option for continuous corded bedside operation
- Snooze duration is fixed at 5 minutes with no programmable interval adjustments
Sharp Digital Bedside Alarm Clock with Simple
The Sharp Digital Alarm Clock combines simple keyboard-style controls with a high-visibility red LED readout and an easy-to-hit snooze bar. With its compact footprint and reliable AAA battery backup that keeps the alarm active during power outages, it is an ideal straightforward bedside clock for minimalists, seniors, and students.
Pros
- Intuitive keyboard-style top buttons make programming time and alarms straightforward for all ages
- Loud audible alarm helps wake deep sleepers and everyday commuters reliably
- Dedicated battery backup keeps the alarm functional even during overnight electrical blackouts
- Oversized top snooze button is easy to press without fumbling around in the dark
- Space-saving 4.35-inch wide chassis preserves valuable space on compact bedside tables
Cons
- Lacks adjustable brightness dimming controls, which may feel too bright for very light-sensitive sleepers
- Requires 2 AAA backup batteries that are not included in the package
- Display remains dark during a power outage until mains AC electricity is restored
DreamSky Auto Set Digital Bedside Alarm Clock
The DreamSky Auto Set Digital Alarm Clock is a compact bedside timepiece featuring a 4.3-inch LCD with blue digits, indoor temperature, calendar readouts, and stepless 0-100% dimming. It is an ideal pick for anyone seeking hassle-free automatic time setup, ascending beeps, and nightstand USB device charging without clutter.
Pros
- Pre-programmed auto-time feature configures proper time immediately upon plugging in across four major U.S. time zones.
- Full-range 0% to 100% dimmer dial enables fine-tuned brightness adjustment to accommodate light-sensitive bedrooms.
- Secondary pass-through USB port lets you charge a mobile phone without taking up an extra wall outlet.
- Gentle ascending beeper ramps up gradually instead of blasting high volume instantly.
- Included cell button battery saves your time and alarm settings during unexpected power outages.
Cons
- Button cell backup maintains memory only and will not illuminate the screen or sound the alarm during a power outage.
- Blue digit wavelength on an LCD screen may not suit sleepers who prefer warm amber or red display tones.
- Lacks dual-alarm programming or weekday-versus-weekend custom scheduling options.
Odokee Digital Dual Alarm Clock with 0-100% Dimmer
The Odokee Digital Dual Alarm Clock combines a 0-100% stepless dimmer dial with an adjustable 30dB to 110dB volume range, making it a dependable choice for light-sensitive sleepers and deep sleepers alike. Featuring flexible 7-5-2 dual scheduling, five wake-up tones, and a rear USB charging port, it provides versatile nightstand utility in a compact footprint.
Pros
- Smooth 0-100% rotary dial permits dimming all the way to complete blackout for pitch-black sleep environments.
- Wide 30dB to 110dB volume span with ascending ramp behavior suits both light and deep sleepers.
- Independent dual alarms support 7-day, 5-day weekday, and 2-day weekend scheduling options.
- Emergency 3 AAA battery backup keeps internal memory intact and sounds alarms during AC electrical failures.
- Rear USB charging port reduces nightstand cord clutter by charging mobile devices directly from the clock.
Cons
- AAA battery backup drains cells quickly if used continuously, functioning strictly as a temporary blackout fail-safe.
- Rear USB charging port does not supply power when operating under battery backup mode.
- High-contrast white LED digits may not suit sleepers who prefer red or amber light wavelengths.
Odokee Digital Bedside Alarm Clock with 2-Inch
The Odokee Digital Alarm Clock delivers bold 2-inch digits, an adjustable 30 to 110dB sound output across five tones, and front-facing controls for quick adjustments. With an integrated USB charging port, an eight-color night light, and a battery backup that sounds the alarm even during blackouts, it offers dependable utility for heavy sleepers, seniors, and compact nightstands.
Pros
- Powerful 110dB maximum alarm volume with progressive ramping helps wake deep sleepers without abrupt startling.
- Battery backup actually triggers the alarm during power failures rather than just preserving clock memory.
- Large 2-inch digits and front-mounted button layout make daily operation simple for seniors, adults, and kids.
- Integrated USB port keeps nightstand wiring tidy while charging mobile devices overnight.
- Five-level dimmer includes a full display-off option for light-sensitive sleep environments.
Cons
- Display remains dark during power outages to conserve AAA battery power, preventing cordless time checks in the dark.
- Backup operation requires two AAA batteries that are not included in the package.
- Stepped five-level dimmer lacks a continuous 0 to 100% rotary dial for infinite fine-tuning.
Complete Walkthrough: Mastering Time and Alarm Configuration on Digital Bedside Clocks
Setting a digital bedside timepiece should feel straightforward, but varied button layouts and cryptic setup modes often cause frustration. Whether you are configuring an auto-syncing bedroom clock, a battery-powered travel model, or a dual-alarm unit, following a structured process prevents unexpected morning misfires. Understanding how your clock handles time registration, alarm schedules, and display settings ensures reliable wakeups every day. This walkthrough guides you through the entire configuration sequence from initial setup to outage-proofing your morning routine.
Identifying the Interface: Button Layouts and Control Schemes
Digital alarm clocks generally use one of three physical control formats to manage setup operations. Classic designs feature mechanical slider switches on the back or top panel, clearly labeled for Time Set, Alarm Set, and Lock positions. Modern units often utilize momentary push buttons or keyboard-style tactile pads across the top surface, allowing direct adjustments without flipping the unit over. Inspecting your clock housing before plugging it in helps you map out which toggles adjust specific digits.
Models designed with front-facing buttons eliminate the awkward reaching often required by crowded rear panels, making adjustments simple while lying in bed. In contrast, streamlined travel clocks frequently place operational toggles on the back to keep the display uncluttered and compact. Identifying the exact location of your directional plus and minus buttons prevents accidental resets when adjusting schedules.
Pay careful attention to the physical separation between the snooze bar and the alarm disarm switch. A generous top-mounted snooze button allows easy access when half-asleep, providing an extra rest interval without clearing your schedule. Disarm buttons should require deliberate contact so you do not accidentally shut off the sound entirely. Familiarizing yourself with these distinct physical boundaries ensures accurate interactions during early morning hours.
Initial Power Connection and Auto-Set Synchronization
Establishing proper electrical power is the essential first step before attempting any time programming. Mains-powered bedside units typically rely on an included AC wall adapter or a direct USB power cable to energize the internal processor and display screen. Battery-powered travel clocks operate entirely on disposable alkaline cells like dual AA batteries, demanding clean terminal contact without any wall cords. Connect your clock to an accessible nightstand outlet, making sure the power cord sits flat without pinching behind furniture.
Certain advanced bedroom clocks feature pre-programmed auto-set circuitry that registers the exact time immediately upon receiving power. Once connected to wall electricity, the internal microprocessor activates and automatically displays the current year, month, date, and hour. If your clock includes this technology, you only need to select your local geographical time zone to align the hours accurately. Additionally, verify whether the automated Daylight Saving Time switch is enabled so the clock adjusts seamlessly between seasons.
Step-by-Step Base Time and Calendar Programming
If your clock requires manual timekeeping setup, begin by switching the main control into time-setting mode. On slider-based clocks, move the switch from the Lock position over to Time Set to unlock the digit fields. On push-button models, press and hold the designated Time button until the hour numerals begin flashing steadily on the screen. Flashing digits confirm that the internal microprocessor is open to receiving directional input from the adjustment controls.
Before advancing the numerals, determine whether you prefer standard 12-hour formatting or 24-hour military notation. When utilizing the standard 12-hour format, monitoring the AM and PM indicator icon is critical to avoid scheduling errors. Setting seven o’clock without verifying that the PM dot is dark means your clock registers morning rather than evening, causing nighttime alarms to fail completely. Use the forward adjustment buttons to dial in the hours and minutes, then return the control to Lock to store your settings.
Programming Single and Dual Alarm Schedules
Entering alarm configuration mode mirrors base time setup but targets your planned wake-up hours. Locate the primary Alarm button or slide the master control toggle over to the Alarm Set position. The display will immediately transition from the live clock to the stored alarm digits, accompanied by flashing numerals and a bell icon. If your clock supports dual alarms, ensure you are adjusting Alarm One rather than Alarm Two before modifying any digits.
Adjust the flashing hour digits using the adjustment keys, verifying once again that the AM indicator illuminates for morning wakeups. Advanced bedside models often provide specialized 7-5-2 scheduling modes, allowing you to assign active alarms for all seven days, weekdays only, or weekend mornings. Selecting a weekday mode eliminates the nuisance of remembering to disable alarms on Friday evening and rearming them on Sunday night. After setting the time and frequency, verify that the physical alarm switch is turned on so the bell symbol stays visible.
Customizing Audio Profiles, Volume, and Snooze Cycles
Auditory wake-up options play a vital role in morning alertness and sleep hygiene. Basic digital clocks emit a fixed-frequency electronic beep, whereas modern units often provide multiple distinct acoustic profiles. These selectable sounds can range from gentle birds chirping and soft musical chimes to assertive buzzers and high-intensity sirens. Exploring different audio tones lets you discover a sound that wakes you effectively without causing sudden morning adrenaline spikes.
Volume adjustment controls allow you to calibrate acoustic output to match your sleep depth and bedroom acoustics. Many bedside clocks feature continuous rotary dials or stepped buttons spanning a wide range from a quiet 30 decibels up to an extra-loud 110 decibels. If you sleep deeply or manage mild hearing challenges, pairing high-decibel volume with progressive crescendo curves prevents abrupt wake-up shock. Many sleepers who need gentle yet dependable mornings also examine sunrise alarm clocks for heavy sleepers to combine auditory alerts with gradual illumination.
Snooze button mechanics vary significantly across different bedside brands and portable form factors. Standard factory configurations typically pause the alarm tone for five, eight, or nine minutes before repeating the cycle. While hitting the oversized snooze bar temporarily silences the buzzer, fully disarming the alarm requires pressing a dedicated front or top off button. Test this disarm sequence in daylight so you know exactly which switch silences the clock permanently without erasing the programmed schedule.
Calibrating Display Brightness for Pitch-Black Sleep Environments
Bedside lighting levels have a direct physiological influence on sleep onset and overnight melatonin production. Many sleepers find that standard factory brightness settings illuminate the entire bedroom with unwanted glare. High-quality digital clocks resolve this issue by integrating continuous stepless rotary dimmers that adjust screen illumination from full brightness down to zero percent. A true blackout setting permits uninterrupted sleep in pitch darkness while keeping the time readable with a slight dial turn.
Display spectrum physics also dictates visual comfort during middle-of-the-night checks. Cool-white and bright-blue LED numerals emit shorter wavelengths that can signal daytime alertness to retinal photoreceptors. Conversely, red, amber, and soft white displays provide gentle contrast that protects nighttime vision and minimizes sleep cycle disruption. Large two-inch bold numerals on high-contrast screens allow seniors and glasses wearers to check the time effortlessly without relying on intrusive, high-brightness settings.
Digit height and viewing angles also affect nighttime usability when checking the time from across the room. Large two-inch bold numbers remain legible without glasses, but lower-tier displays can wash out when viewed from low mattress angles. Choosing a clock with an adjustable viewing stand or wide-angle contrast prevents distortion when glancing at the nightstand from a lying position.
Power Outage Resilience: Battery Backup Architecture Explained
Understanding how your digital clock behaves during residential power cuts prevents missed workdays and appointments. Bedside digital alarm clocks utilize two distinctly different battery backup designs that buyers often confuse. The most prevalent design is passive memory retention, which relies on a pre-installed CR2032 button cell or auxiliary AAA batteries. This circuit preserves the internal quartz clock, calendar, and alarm times during a blackout, but it will not light the display or sound the audible alarm.
In contrast, fully operational battery backup systems continue powering the internal speaker and trigger acoustic alerts even when wall electricity fails completely. Clocks with this active architecture typically shut off the power-hungry LED screen during an outage to conserve energy, yet the buzzer still fires accurately at your set time. If reliable wakeups during severe weather are vital, verify whether your model supports active acoustic sounding or memory-only storage. Checking this specification in your product documentation avoids false assumptions about outage reliability.
Integrating Nightstand Charging and Auxiliary Bedside Features
Bedside tables frequently become cluttered with tangled cords, bulky power bricks, and multiple electronic accessories. Many modern digital clocks incorporate auxiliary USB charging ports directly into their rear or side housings to consolidate nightstand wiring. Connecting your smartphone, e-reader, or tablet directly to the clock eliminates the need for extra wall adapters behind your headboard. This integrated power delivery keeps your nightstand tidy while supporting a dedicated charging hub right beside your mattress.
When using auxiliary USB ports, ensure that your device charging cables are routed neatly without sharp bends or kinks that stress the connectors. Furthermore, individuals seeking an even cleaner nightstand layout often investigate dedicated alarm clocks with wireless charging pads to power Qi-compatible devices without handling cords. When using wireless inductive pads, always verify proper coil alignment and avoid excessively thick phone cases that generate excess heat during overnight charging sessions.
Some multi-function digital models also include ambient room thermometers, humidity sensors, or multi-color decorative night lights. Navigating these secondary features generally requires pressing dedicated auxiliary buttons located on the front or side panels. When configuring ambient light colors, choose gentle modes that complement your bedroom decor rather than intense flashing sequences.
Troubleshooting Common Programming Errors and Drift
Even with careful configuration, digital bedside clocks occasionally exhibit unexpected behavior that requires simple troubleshooting. One of the most common oversights involves the volume potentiometer dial being inadvertently turned down to zero. In this state, the clock will trigger the visual alarm icon and flash the screen at the designated minute, but no sound will emit from the speaker. Regularly checking that your volume knob sits at an audible level prevents silent wake-up failures.
Another frequent issue is subtle quartz crystal drift, which causes standalone digital clocks to gain or lose a few minutes over several months. Unlike internet-connected smartphones, basic digital clocks rely on internal crystal oscillators that can vary slightly with room temperature changes. Performing a quick synchronization check once a month keeps your bedside clock aligned with precise standard time. If a sudden power surge resets the digits to midnight, replacing the backup batteries restores immediate memory protection for future outages.
Configuring a bedside digital alarm clock creates a dependable, phone-free wake-up system that fosters better sleep habits and punctuality. By mapping your clock’s physical buttons, verifying 12-hour AM and PM indicators, and calibrating comfortable display brightness, you eliminate morning stress. Performing a quick dry-run test confirms that volume, snooze intervals, and backup batteries are ready to perform. With your settings locked in place, you can sleep peacefully knowing your nightstand clock will wake you right on time.
About the author
Jeremy Klein is an experienced sleep-product tester with a strong focus on testing methodology, data collection, and real-world product performance. His expertise includes evaluating sleep essentials and wake-up devices through structured testing and practical consumer-focused criteria.