
How to Connect Smart Clock to Wifi: Practical Guide for 2026
Learn how to connect smart clock to wifi with reliable network settings, pairing tips, and automatic time sync troubleshooting for October 2026.
 By Daniel Noyed
Updated October 6, 2026
By Daniel Noyed
Updated October 6, 2026

Waking up to an inaccurate bedside clock creates needless morning chaos, especially when seasonal time changes or brief power dips reset traditional displays to a flashing midnight readout. Traditional quartz clocks gradually drift over weeks of operation, leaving sleepers uncertain about their exact wake-up window. Learning how to connect smart clock to wifi eliminates this frustrating cycle by tethering your bedroom timepiece directly to automated atomic time servers. Instead of keeping a distracting smartphone on your nightstand to guarantee precise timing, a synchronized bedside unit delivers exact accuracy while supporting a restful, screen-free evening environment.
Modern connected timepieces bridge the gap between standalone digital appliances and home automation convenience. Connecting these devices to a local wireless network allows them to automatically synchronize regional time zones, adjust for Daylight Saving Time, and pull real-time weather and temperature data straight to your headboard. Many homeowners transition from phone alarms to reliable bedroom alarm clocks because dedicated hardware prevents late-night notification temptation. Understanding the exact pairing sequence ensures that your wireless clock pairs quickly on the correct radio band, providing dependable wake-up schedules without unexpected network dropouts.
| Award | Product | ACR Score About ACR ScoreThe ACR Score is our own rating from 0 to 10, based on performance, design and build, ease of use, and value. It reflects independent research and is never influenced by manufacturers, retailers, or affiliate commissions. Learn more › | |
|---|---|---|---|
| Best Overall |
Tempospark 12-Inch WiFi Digital Clock with Auto
|
9.1/10 | Buy |
| Best Value |
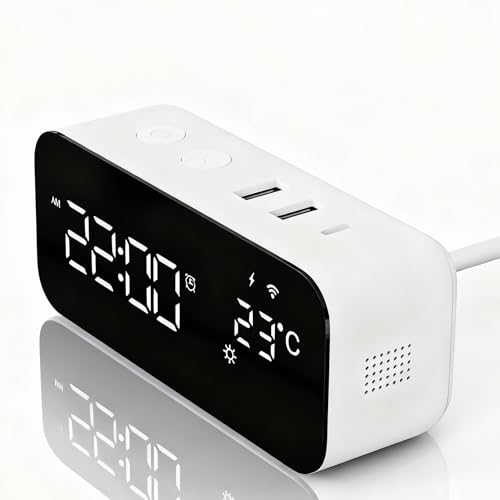 Jinvocloud Smart WiFi Digital Alarm Clock with 20W
|
8.1/10 | Buy |
Tempospark 12-Inch WiFi Digital Clock with Auto
The Tempospark 12-inch WiFi digital clock provides self-setting accuracy with automatic DST updates, clear 3-inch green digits, and dual alarms operated by remote control. It is a dependable choice for bedrooms, home offices, and living spaces needing high-visibility timekeeping without manual adjustments.
Pros
- Automatic internet time synchronization eliminates the chore of manual clock adjustments after power interruptions
- Oversized 3-inch green numerals provide outstanding legibility for seniors and visually impaired household members
- Mute button sound feature silences remote clicks while maintaining active alarm functionality
- Includes remote control, 10-foot USB cord, and AC power adapter directly in the box
- Multipurpose utility combining dual alarms, count-up/countdown timers, and ambient climate tracking
Cons
- Three stepped brightness settings lack a continuous 0-100% stepless dial or full screen blackout mode
- Requires constant AC wall power with no internal battery-powered operation during outages
- Wide 12-inch footprint may occupy significant tabletop space on narrow bedside nightstands
Jinvocloud Smart WiFi Digital Alarm Clock with 20W
The Jinvocloud Smart WiFi Alarm Clock combines multi-device fast charging with app-driven scheduling, offering 10 custom alarms and real-time weather readouts. It is a practical bedside command center for busy professionals and students wanting phone-app convenience without extra nightstand clutter.
Pros
- Dedicated high-speed charging hub with 20W USB-C PD and two 18W USB-A ports
- Automatic network time synchronization eliminates manual time drifting
- Supports up to 10 customizable alarm profiles via the Tuya or Smart Life app
- Includes a complete display-off mode for sleepers sensitive to nightstand light
- Compact 4.72 x 1.5 x 1.97-inch design takes up minimal space on bedside tables
Cons
- Requires a 2.4GHz WiFi network for remote app configuration and does not support 5GHz bands
- Does not support voice commands or integration with third-party smart speakers
- Relies entirely on its 1-meter wired power cord with no listed battery backup for power failures
Complete Guide to Smart Clock Wireless Pairing and Configuration
Connecting a smart bedside clock to your home wireless network establishes a maintenance-free timekeeping setup that never requires manual adjustment. While standard battery-powered quartz clocks drift by several seconds each month, a synchronized wireless unit contacts atomic time servers continuously to preserve precision. Completing the setup involves matching your router broadcast frequency, selecting the proper pairing mode, and configuring companion controls. Following a deliberate sequence prevents connection drops and keeps your bedside alarms running smoothly.
Network Preparation and the 2.4GHz Wi-Fi Requirement
Smart alarm clocks and connected wall displays almost universally communicate on the 2.4GHz wireless frequency rather than 5GHz channels. Lower-frequency 2.4GHz radio waves travel through bedroom walls and nightstand furniture with greater range, making them ideal for smart home hardware. Dual-band routers frequently broadcast both frequencies under a single unified network name, which can confuse microcontrollers during pairing. Verifying that your router broadcasts an active 2.4GHz channel is the foundational first step before putting the clock into pairing mode.
If your smartphone connects to a 5GHz band automatically, it may fail to bridge wireless credentials to the clock. Temporarily separating your router bands into dedicated names or walking farther from the router forces your mobile device onto the 2.4GHz frequency. Alternatively, many modern router interfaces allow you to pause the 5GHz frequency for ten or fifteen minutes during onboarding. Confirming that client isolation and guest network firewalls are disabled also guarantees that the clock communicates freely with your phone.
Network security protocol settings also influence whether your clock can successfully join the local network. Most connected clocks communicate best with standard WPA2-Personal security, whereas newer WPA3-only configurations or enterprise portals can reject basic Wi-Fi chips. Checking that your wireless password avoids unsupported non-standard characters prevents credential rejection during transmission. Once your phone sits firmly on an accessible 2.4GHz channel near the router, your smart clock hardware is ready to receive network instructions.
App-Based Pairing Protocols Using Tuya and Smart Life
Bedside devices like the Jinvocloud Smart WiFi Alarm Clock with Timer utilize universal platforms like Tuya or Smart Life for network provisioning. To start the process, download the designated application from your phone’s app store and register a user account. Power on the clock using its supplied cord, then press and hold the designated pairing button until the screen indicator blinks rapidly. This rapid flashing confirms that the internal network receiver is actively broadcasting and listening for nearby configuration packets.
Modern mobile applications often utilize Bluetooth discovery to detect nearby hardware automatically. Granting temporary Bluetooth and local network permissions on your phone allows the app to display an instant setup prompt when the clock enters pairing status. When the device card appears on your screen, tap the confirmation prompt and input your 2.4GHz network password carefully. The application then transmits the encrypted wireless credentials directly to the clock, establishing an authenticated connection with your local router.
If automatic discovery fails to detect the flashing clock, manual device selection provides an equally reliable alternative. Within the application menu, navigate to the small home appliances category and choose the smart clock option. Follow the on-screen prompts to confirm whether the pairing icon is flashing rapidly or pulsing slowly in access point mode. Once verified, the software counts through a pairing sequence that generally locks into the home network in under two minutes, turning the flashing network icon solid.
Direct Web Portal and Remote-Assisted Setup Methods
Certain wireless displays bypass third-party phone applications entirely, relying instead on internal access points or dedicated remote interfaces. The Tempospark WiFi Digital Clock 12″ uses a focused three-step setup architecture designed to get users running without creating separate user accounts. In direct access point workflows, putting the clock into Wi-Fi setup mode causes the clock itself to broadcast a temporary wireless hotspot. Users simply connect their smartphone or tablet directly to this temporary network name to open a local configuration portal.
Once connected to the clock’s temporary network, an internal configuration page loads automatically in your mobile web browser. This interface scans the surrounding environment and displays all detected local 2.4GHz wireless networks on a clean drop-down menu. Selecting your private home router and entering your Wi-Fi password directs the clock to drop its temporary broadcast and connect directly to your home network. After the clock verifies the internet handshake, your phone automatically reconnects to home internet while the clock begins time synchronization.
Hardware accompanied by dedicated remote controls simplifies operational adjustments once the base Wi-Fi connection is locked in. The bundled infrared remote allows users to modify dual alarms, cycle timer modes, and adjust display brightness from across the bedroom without reaching behind furniture. Furthermore, the remote interface on the Tempospark display features independent sound toggles, allowing users to silence button-press beeps while leaving wake-up alarms fully active. This distinction ensures quiet adjustments late at night without disturbing a sleeping partner.
Internet Time Synchronization, DST Updates, and Weather Telemetry
The primary functional benefit of establishing a Wi-Fi connection on a bedside clock is perpetual time accuracy. Network-enabled clocks pull data from Network Time Protocol servers, which reference high-precision atomic clock signals worldwide. This continuous background synchronization eliminates the multi-minute drift common in traditional battery quartz clocks. When selecting your physical time zone within the device setup portal, verify whether you prefer a standard 12-hour AM and PM readout or an international 24-hour military format.
Automated Daylight Saving Time tracking removes another traditional bedside headache. Clocks engineered with active network firmware detect seasonal time shifts autonomously, moving the display hour forward or backward at the statutory changeover moment without requiring manual clock hands or button tapping. If your geographical region does not observe Daylight Saving Time, most setup interfaces include a simple toggle switch to disable seasonal adjustments permanently. This automated stability ensures you never wake up an hour late on critical workday mornings.
Connected clocks frequently expand beyond pure timekeeping by drawing local meteorological data to their front glass displays. By referencing your geographic location through the connected home network, devices like the Jinvocloud clock display real-time weather alerts spanning sunny, cloudy, rainy, and snowy conditions alongside ambient indoor temperature readings. Users interested in natural morning transitions can combine this environmental awareness with gradual wake-up light clocks to create a well-rounded morning awakening routine. The combination of local sensor hardware and cloud-fed weather data turns a basic nightstand clock into an informative morning dashboard.
Power Delivery Needs and Network Retention Architecture
Smart digital alarm clocks require continuous electrical power to sustain their internal Wi-Fi radios and dynamic LED panels. The active transmission of network packets and continuous background listening states consume substantially more current than basic LCD quartz timers. Consequently, connected clocks depend on continuous mains AC power delivery through dedicated wall adapters and USB cables. The Tempospark model includes an expansive 10-foot USB power cable and adapter for flexible mounting, whereas compact desktop models utilize shorter cords suited for immediate headboard outlets.
Understanding how internal memory architectures operate during residential power cuts prevents unexpected wake-up failures. Most modern Wi-Fi clocks utilize non-volatile flash memory to store network security keys, regional time zone settings, and scheduled alarm groups. When a residential power outage occurs, the clock drops its active LED display and Wi-Fi transmission temporarily. However, as soon as wall power returns, the internal processor reads the stored network credentials, reconnects to your home router, and retrieves the exact time automatically without manual intervention.
Some digital models include a small coin-cell battery compartment or internal capacitor designed exclusively for time-memory retention during brief power blinks. These auxiliary cells do not typically power the bright LED display or sound audible alarms while mains power is severed. Instead, they keep the internal quartz circuit ticking silently until main AC current resumes. Verifying that your bedside cord is plugged securely into an unswitched wall outlet guarantees that the clock never loses power when a wall switch is flipped accidentally.
Bedroom Optical Ergonomics and Display Dimming Calibration
A high-contrast digital display is wonderful for daytime visibility across a spacious bedroom or classroom, but excessive nighttime glare ruins sleep hygiene. Digital displays emitting harsh blue or cool-white light suppress natural melatonin production, making it difficult for sensitive sleepers to fall into deep restorative cycles. Quality connected clocks counter this problem by incorporating comprehensive dimming systems that let users calibrate brightness to match changing bedroom light conditions. The Tempospark display features large three-inch green digits across a 12-inch screen, offering three distinct brightness steps to balance visibility against nightstand comfort.
For pitch-black sleeping environments, having the option to extinguish the display entirely is a substantial advantage. The Jinvocloud smart clock supports four discrete brightness stages, including high, medium, low, and a true off setting that blacks out the screen completely while keeping background alarm routines active. Users can adjust these brightness levels directly via physical chassis buttons or remotely through the connected smartphone application without getting out of bed. This flexibility allows you to keep the room entirely dark overnight while still waking up to programmed morning chimes.
Proper nightstand angle and digit placement also reduce visual strain during late-night checks. High-contrast LED layouts allow users who wear glasses to read the current hour without squinting or fumbling around their bedside table. If your nightstand already holds multiple electronic accessories, pairing your clock with alarm clocks with charging stations can help consolidate cords and eliminate extraneous glowing standby lights. Positioning your screen away from direct eye level further mitigates peripheral light bleed while maintaining instant visibility from the mattress.
Diagnosing Dual-Band Router Conflicts and Connection Dropouts
When a smart clock refuses to pair or periodically drops offline, dual-band router steering is almost always the underlying culprit. Modern mesh wireless systems frequently attempt to force connected devices onto high-frequency 5GHz bands to optimize general household bandwidth. Because smart clock network cards lack 5GHz transceivers, this aggressive steering can cause the clock to drop its wireless link or fail during initial verification. If you experience persistent pairing timeouts, log into your router administration portal and create a dedicated 2.4GHz guest network exclusively for your smart home accessories.
Physical signal degradation through bedroom walls and dense furniture can also undermine network reliability. While a smartphone might show full Wi-Fi bars on the nightstand due to its advanced multi-antenna array, a compact clock contains a much smaller internal antenna with modest reception capabilities. Repositioning your clock just a few inches away from thick metal headboards or large mirrors can dramatically reduce radio interference. Additionally, ensure the clock sits within a stable signal zone where Wi-Fi packet drops do not disrupt automated time checks.
Router security configurations such as MAC address filtering or strict firewall rules can silently block new smart devices from reaching public NTP time servers. If your clock shows a solid connection icon but displays an incorrect hour, verify that outbound NTP port 123 traffic is not blocked by your router firewall. Performing a power cycle by unplugging the clock for thirty seconds often forces the internal network chip to renegotiate its IP address lease. Once your router assigns a clean local IP address, the clock synchronizes its digital readout immediately.
Managing Multi-Alarm Schedules and Nightstand Device Charging
Configuring complex wake-up schedules directly on small rear-mounted clock buttons is notoriously tedious, often leading to accidental schedule mismatches. Migrating setup controls to a synchronized mobile application resolves this usability hurdle completely. With connected app management, users can program extensive schedules, such as configuring up to ten independent alarm groups on the Jinvocloud clock to accommodate alternating work shifts, school routines, and weekend wake-up times. The software interface displays active alarms in a clear visual list, eliminating confusion regarding whether an alarm is set for AM or PM.
Audio customization and snooze parameters also benefit from app-based control. Dedicated smart alarm clocks provide natural chime tones and multi-stage volume adjustments, allowing sleepers to wake up to gentle acoustic transitions rather than jarring, blaring buzzers. Snooze modes can often be customized for specific intervals, giving deep sleepers short, predictable rest extensions before the primary chime sounds again. Furthermore, the silicone anti-slip base engineered into quality desktop clocks keeps the housing stable when reaching over groggily to press the top snooze bar.
Modern bedside clocks frequently serve as centralized nightstand charging hubs, eliminating the clutter of multiple power bricks plugged behind the bed. The Jinvocloud platform integrates a high-speed 20W Type-C Power Delivery port alongside dual 18W USB-A ports, delivering sufficient power to fast-charge modern smartphones, tablets, or wearable trackers overnight. Consolidating your charging needs into the clock base keeps your nightstand tidy while preventing electrical cord tangles near your pillow. Following proper electrical guidelines and using rated charging cables protects your connected devices and ensures quiet, reliable operation every morning.
Mastering wireless clock synchronization transforms an ordinary bedside timepiece into an accurate, maintenance-free bedroom command post. Once your smart clock locks onto an uninterrupted 2.4GHz network channel, automated atomic time synchronization, Daylight Saving adjustments, and remote schedule programming operate silently in the background. Take a moment after initial setup to trigger a silent test alarm, confirm your local time zone parameters, and dial in comfortable nighttime brightness levels. With network communication properly established, your bedside setup delivers dependable punctuality every morning without requiring phone notifications next to your pillow.
About the author
Daniel Noyed is a Certified Sleep Science Coach and experienced product editor with extensive knowledge of sleep health and sleep-related products. He has hands-on experience testing hundreds of products and translating technical features into practical guidance for everyday sleepers.